A long time ago a close friend once told me that it appeared that the secret to success in the crochet design world was having a blog. The formula, as she saw it, was that others in the industry saw the blog and referred more people to it. Somewhere along the line it would be seen by someone in the television industry, and once an interview was secured, so was your future as a crochet designer. Interesting theory.
It turns out that there may be quite a bit of truth in it. Most "make money online by blogging" sites delve into the necessity of back links, or links from other well known sites that rank high in Google's list. These back links should be from sites with similar subject matter. The more of these links, or referrals, the higher your blog will rank on Google's search list.
Once your blog shows up in the first couple of pages from a Google or Yahoo search, more people check it out. The odds of someone clicking on an ad on your blog increase exponentially. Every ad click is counted and credited by AdSense and the owner of the blog then gets paid. Every referring ad to Amazon to a product you discuss on your blog also generates income.
Yet there is more to becoming a successful crochet designer than being web savvy. The great ones not only make every gift they give to anyone for any occasion, they also publish their designs frequently. From what I have learned about these designers, they churn out at least 15-20 designs per year for various publications. This means that for every magazine, book, and web site they checked the editorial calendar, had an idea, sketched it out, made a gauge swatch and submitted it and waited for an acceptance letter and contract.
Things turn around a bit once a designer is known to editors and yarn companies. The designer may start receiving requests from them. Although I have found no information on the web about this, I suspect that higher prices are paid per design at this point. As the amount of publications increase, the more well known the designer becomes. They may be asked to appear on a craft show on television.
Another friend once said "if you like what you do, stick with it and the money will come." Great advice for any field, but especially crochet design as there is a lot of non-compensated work involved before any financial achievement is gained.
Tuesday, May 31, 2011
Friday, May 27, 2011
What Crochet Sells at Craft Shows?
Crochet is by far my favorite craft. It is so versatile, one can make almost anything using a hook. It's no wonder that crochet in its many varieties can be found at craft fairs.
My primary medium of choice is 100% wool. I live in an area where I can purchase this yarn from local farmer's markets at an extremely reasonable price. People are willing to pay more for items made with wool than with acrylic. My best sellers at craft fairs are by far hats, mittens, and gloves. One year I made 30 pair of fingerless gloves in various sizes, and sold every one of them between the 2 craft fairs I attended.
Hats, mittens, and gloves are also popular items for knitters and fleece sewers. Therefore, I try to have some unique crochet items on my table as well - thread bookmarks, different styled wool hats, doll accessories that match child size accessories (ponchos, purses, etc.)
Sweaters are also generally a good seller at craft fairs, if you have the time to make them. Remember you should have a variety of colors and sizes for people to choose from. The days of having a sample for people to look at and order from are pretty much history. Customers want to be able to take home the items right then. The only exception I have found for this are items that are best when custom made: Christening gowns, dresses, and bathing suits.
Anything that is unusual or looks elegant generally sells well if it is priced well. Think crocheted lace, angels, Christmas ornaments, snow villages - all wonderful choices for fall shows.
When deciding what to sell at craft fairs, you need to keep in mind how much time it will take to make, material cost, and what you can reasonably sell it for. Cute little cell phone cozies make only take an hour and very little yarn, but they don't sell well. Electronics do not like to be kept warm. It may take you 8 hours to make a hat, but don't expect to sell it for $80.
The more craft fairs you attend, the more you will get a feel for what items sell and at what price. If you talk to other vendors and customers, you can get a better idea of what would be a good seller.
Thursday, May 26, 2011
Plan For Fall Craft Shows
Even though it is not quite yet Memorial Day, now is the time to schedule your fall craft fairs if you haven't already. Most fairs are organized 2-3 months in advance, but many require even more time.
Start with what you know. What craft fairs do you see every year in your area? Where are they held? Which would you like to be part of? Find the coordinator of each, and call or write for the vendor guidelines and application. Pencil them into you calendar.
You may find that a fair you are interested in is juried. This means that in order to set up at that fair, you must apply and show your intended items for sale to a group of people, or jury, for judging. If your items meet the criteria they have set, you will be invited to their fair. There is usually a charge to be juried and another charge for the booth should you be selected. This is an excellent choice if you are looking for feedback from craft enthusiasts about your work. Juries are held anywhere from 1-3 months before the fair.
Remember that craft fairs are a lot of work. Many will require that you bring your own table and chairs, in addition to your display(s) and your product. They usually allow 2 hours for set up. Do you have the energy to schedule a fair every weekend? Do you have enough inventory to sell? Can you fit everything into your vehicle?
Crocheted items that are not starched to maintain their shape usually do not take up lot of space, but you do not want your items to look like they've been used as packing material. I find that plastic bins work well for both packing items for transport to and from the fair as well as organization at the fair.
Plan out your craft fair season well in advance. This will give you the time to adequately prepare for each show. When you are prepared, it's easier to relax and concentrate on the task at hand. Craft fairs should be both enjoyable and profitable.
Wednesday, May 25, 2011
One Idea For What To Do With Leftover Yarn
We've all been there - completed a project with a partial skein leftover that had no purpose. There's too much to simply throw away, and you don't want to be wasteful. Try this trick I learned a long time ago: ball it.
Take your first partial skein of a particular weight and fiber and wind it into a ball. Now, every time you finish a project using the same weight and fiber add it to your ball. Eventually you will have enough there to make something with.
It is very important that you keep the fiber content and weight of the yarn consistent in your ball. You don't want to finish an item, only to have part of it shrink or felt or otherwise get ruined in the wash.
Worsted weight acrylics and acrylic blends make wonderful scrap yarn afghans. A friend calls them, "so ugly they are beautiful". Usually these are on a bed, so they will not be display pieces, but still warm and functional.
Worsted weight cottons can be used to make unique handbags and tote bags. Many commercial versions of these products are of various color and print, so your crochet version is not likely to be considered an eye sore.
Worsted weight and sport weight wools can create wonderfully eclectic sweaters or set the tone of a room as a rug. Baby yarns tend to have the same color tone, so you can create more baby items with them. The possibilities are as endless as your imagination!
In the long run you will be saving money as well. Once, when I had just started a new job and had nothing extra to purchase yarn with and Christmas fast approaching, I made a rainbow afghan entirely out of scrap. I had a bin full of partial skeins of worsted weight acrylic. I took each one, balled it, and then lined them up on the table in the order of a rainbow. Various shades of the same color were put in order of what I thought looked nice. Starting with the purples (violet is the last shade of the rainbow) I rolled a ball in reverse order - violets, indigo, blues, greens, yellows, oranges, and finally reds. Upon crocheting it in rows of double crochet, the color effect was simply stunning. Small amounts of one color and larger amounts of another, added with the various shades of each, really did mimic that of a rainbow. I don't think I would have put all of those colors together if I had gone out and purchased the yarn. I had made an absolutely beautiful, one of a kind afghan without spending a cent AND I cleaned up my yarn closet in the process!
Give it a try, and share what you come up with!
Tuesday, May 24, 2011
The Challenge of Crochet Design
Sometimes I wonder if crochet design is like writing. When the muse hits, I have dozens of ideas I put into a notebook. Sometimes they just sit there. Sometimes I look them over and wonder what on earth I had been thinking. Sometimes there is a true gem among them.
The overall design for my Herrschnerr's entry is now on paper. I know it will get tweaked several times before the final version is complete, but at least I now have a guide to go by. I've found that if I type the instructions as I go, it makes putting together the final printed pattern easier.
Basically, my formula works like this:
Sketch
I am horrible at drawing, but I know what I'm trying to put on the paper. I might use symbols or write notes in different areas of the sheet. Usually there are arrows pointing at various things. To anyone else, it would look worse than a doodled on piece of paper, but to me it acts like a table of contents.
Plan
What yarn would work best? What hook should I use that will provide the proper drape of the yarn? What is my gauge when combining the two? How large do I want the finished product to be? How many stitches will I need? This period takes a lot of trial and error, and therefore a lot of time. I will usually make several different gauge swatches, trying to find the exact feel for the piece I want to create. Counting stitches, taking measurements of swatches, and doing the math is an absolute requirement. One of the toughest parts is making sure the stitch pattern I want to use divides evenly into the number of stitches I need to make the size I want.
Start Crocheting
Now that I have the pattern I will be using in my head, I need to start making it to verify that it will work the way I want it to. Every row gets a notation, such as "color A, 140 sts" or "hdc, (sc,dc) across. When I put the yarn and crochet hook down, I'll bring my notes to the computer and type in what I did in standard notation; i.e. "Using color A, sc in each stitch across (140 sc)".
Finishing
Finish off the crochet work by weaving in all ends and blocking if necessary. Finish off the pattern by reviewing it to make sure it would make sense to someone else. I have a friend who like to pattern test for me, and she will email me any questions she has. I know that if she has a question, others would as well, therefore I modify the pattern to make it clearer.
All in all, I find designing crochet items a fun thing to do. I know I have a lot left to learn about it, but everyone has to start somewhere, right?
Monday, May 23, 2011
A Crochet Contest True Story
Sometimes life takes strange twists and turn. On my honeymoon many years ago I came across a crochet magazine that featured a contest winning afghan entitled "Stained Glass Window". It was absolutely beautiful! At that time, I was still a novice as far as crochet goes. Yet I showed that magazine to my husband and said "I am going to win a contest like that someday!" It didn't matter that he pointed out my skill level wasn't anywhere near what was required to make that afghan, let alone enter and win a contest.
Fast forward several years. Crochet was my constant companion by this time. Browsing the web, I came across the annual Herrschner's Afghan Contest. I took a tremendous leap of faith, as the afghan had to be completed in 6 weeks. Feeling creative that day, I decided to take the plunge and send in an entry form. While that was waiting in the mailbox for the postman, I made a sketch on graph paper and browsed my numerous stitch directories until something jumped out at me. I chose offset clusters as they reminded me of bubbles. Due to the time constraints, this afghan went EVERYWHERE with me. I'd complete a stitch or two at stop lights while driving, a row or two on breaks at work, etc. Somehow I managed to finish it. By this time I had received the entry instructions, which I must have read a dozen times to make sure everything was done right. I sent it priority mail and tracked its progress with bated breathe, hoping it would arrive in time. It did.
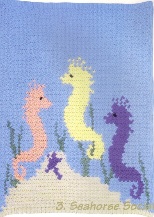
The next several weeks seemed to last an eternity, wondering what the judges thought. Finally, I received a congratulations letter in the mail, notifying me that my afghan "Seahorse Social" was awarded honorable mention.
 I think that naming my entry was the most difficult part. I asked for input from my entire family before finally deciding on something.
This experience opened up a whole new world for me. I realized I had to learn a thing or two about the world of crochet design. I did not receive a lot of money but I did gain some notoriety. I would meet people who would tell me that they had either seen or ordered my design from Herrschner's. Unfortunately, at the time I could not devote myself to full time crochet designing, as much as I would have liked to.
Perhaps this year I will enter again - afghans are due July 15th.
Fast forward several years. Crochet was my constant companion by this time. Browsing the web, I came across the annual Herrschner's Afghan Contest. I took a tremendous leap of faith, as the afghan had to be completed in 6 weeks. Feeling creative that day, I decided to take the plunge and send in an entry form. While that was waiting in the mailbox for the postman, I made a sketch on graph paper and browsed my numerous stitch directories until something jumped out at me. I chose offset clusters as they reminded me of bubbles. Due to the time constraints, this afghan went EVERYWHERE with me. I'd complete a stitch or two at stop lights while driving, a row or two on breaks at work, etc. Somehow I managed to finish it. By this time I had received the entry instructions, which I must have read a dozen times to make sure everything was done right. I sent it priority mail and tracked its progress with bated breathe, hoping it would arrive in time. It did.
The next several weeks seemed to last an eternity, wondering what the judges thought. Finally, I received a congratulations letter in the mail, notifying me that my afghan "Seahorse Social" was awarded honorable mention.
This experience opened up a whole new world for me. I realized I had to learn a thing or two about the world of crochet design. I did not receive a lot of money but I did gain some notoriety. I would meet people who would tell me that they had either seen or ordered my design from Herrschner's. Unfortunately, at the time I could not devote myself to full time crochet designing, as much as I would have liked to.
Perhaps this year I will enter again - afghans are due July 15th.
Friday, May 20, 2011
Yarn Stash Control
As any crochet, knit, or yarn enthusiast is well aware, their stash of yarn can easily take over the entire house. My breaking point, that point at which I knew I had a problem I had to figure out how to control, was when I went looking for a particular yarn in my closet, my daughter's room, the hallway closet AND my yarn closet without finding what I was looking for. I did, however, find that the space bags I had so carefully packed with precious yarn had split open.
That experience, coupled with the decline in the economy, led to stash control rule #1:
ONLY PURCHASE YARN FOR A SPECIFIC PROJECT
Since I have so much yarn around the house already, rule #2:
LOOK THROUGH WHAT YOU HAVE ON HAND BEFORE BUYING ANYTHING! USE IT IF YOU HAVE IT!
How many times have you come across a yarn that you had purchased because it was beautiful and you would find a use for it someday? Then, when you have found that use, you realize you don't have enough of the yarn to complete the project? Thus, rule #3:
PURCHASE ENOUGH YARN TO COMPLETE THE SPECIFIC PROJECT AND LABEL IT WHEN YOU GET HOME
I use 2 1/2 gallon zip lock bags and write on them with a Sharpie what project I have in mind for it. I know I can find the pattern directions in my Crochet Calender Binder (see previous post) which I take out and place a check mark next to the materials just purchased. All of these zip lock bags are in the same location, so I know exactly where to look to find it.
Following these three rules has taken a dent out of my stash, thus making it much more manageable. It has also saved tons of time looking for yarn, giving me more time to crochet it!
What's Next? Check Your Crochet Calendar!
Organization does not come easily, but over the years I have put together a way of managing my crochet projects. It has become an invaluable tool for me, and it can for you too!
Materials Required:
May 8, Mother's Day: mom, Equestrian Sweater, Crochet Today! Jan/Feb 2011 p.35
RH Mystic, 154 yd/ball x 9 balls, (3) 1" buttons
You may want to do the math before you go shopping if you think you might end up using a different yarn (remember those extra lines you left in-between entries?)
154 yd/ball x 9 balls = 1,386 yards
Some patterns do not give the yd/ball on the material list; in this case, look the product up online to find the yardage. If math is not your thing, you can take your best guess and add one skein. Most yarn stores will allow you to return unused skeins.
When you plan on going shopping for yarn, simply take out your calendar page so you will know at a glance exactly how much you need of what kind. I took mine to my local fiber festival and came home with about 90% of my project materials ready to use!
Your crochet calendar also allows you the option of recording your project start and completion dates. This will give you a good idea how long to allow for certain projects assisting your time management.
What are you waiting for? Go get organized!
Materials Required:
- 3 ring binder
- lined filler paper
- binder ready report covers or pocket folders
- pencil
- Put the filler paper in front and the report covers or pocket folders in the back of your binder.
- Consult a calendar and write in all important dates in chronological order.
- Leave space (at least 2 lines) between entries.
- As you come across a pattern that is just perfect for someone on your list, write in the name of the publication (magazine, book, etc.), name of the design, page number, and materials required. This way you can find your material list for your next project right away, without referencing the pattern.
- Fill the report covers or pocket folders with copies of the pattern, or the print of a pattern found online. This will become your working pattern that you can make notes on and check off rows as they are completed.
- Keep your binder in a book bag with the books and magazines that contain the patterns to be used.
- Use the filler pages behind your calendar to list the things you would really like to make. You can have a page for every person (including yourself) that you make things for and/or category pages for home decor, teacher gifts, etc.
May 8, Mother's Day: mom, Equestrian Sweater, Crochet Today! Jan/Feb 2011 p.35
RH Mystic, 154 yd/ball x 9 balls, (3) 1" buttons
You may want to do the math before you go shopping if you think you might end up using a different yarn (remember those extra lines you left in-between entries?)
154 yd/ball x 9 balls = 1,386 yards
Some patterns do not give the yd/ball on the material list; in this case, look the product up online to find the yardage. If math is not your thing, you can take your best guess and add one skein. Most yarn stores will allow you to return unused skeins.
When you plan on going shopping for yarn, simply take out your calendar page so you will know at a glance exactly how much you need of what kind. I took mine to my local fiber festival and came home with about 90% of my project materials ready to use!
Your crochet calendar also allows you the option of recording your project start and completion dates. This will give you a good idea how long to allow for certain projects assisting your time management.
What are you waiting for? Go get organized!
Thursday, May 19, 2011
Late again! Yet another crochet gift finished....
I have finally finished my last mother's day gift. With any luck, I'll be able to get it in the mail today.

I wanted to find something that my mother in law could wear around the house, any time of year, to keep away the chill. I opted for Darla Sims "Breezy Duster" ( http://www.free-crochet.com/detail.html?code=FC01211&cat_id=334 ) As usual, I ended up changing it around a bit - it's no longer a duster but more of a sweater. I opted for 25" length from the bottom to the arm hole, then made the sleeves in one piece each instead of two. I changed the pattern on the sleeves to allow for the increases.
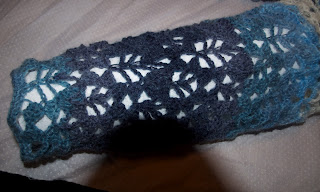
It's made from Paton's Lace, which I totally enjoyed working with.
Subscribe to:
Posts (Atom)